Garden Help

Pruning Shrubs Damaged by Winter Snows and Spring Ice Storm.
2025 has been a tough year on our trees and shrubs! Heavy winter snows and the recent spring ice storm have taken a toll on our trees and garden shrubs, leaving many of them damaged and in need of attention. Pruning is an effective way to help your plants recover and promote healthy growth going forward.
While we suggest you call an arborist to deal with any large tree damage and cleanup, many of the smaller trees and shrubs in our yards and landscape can be handled by home gardeners.
Before you begin pruning, it's essential to assess the extent of the damage to your shrubs. In particular, look for broken branches and split stems: These can occur when ice or heavy snow weighs branches down past their breaking point.
Tools of the Trade: The following tools are handy to have on hand for regular pruning and may get an extra workout this spring! Keep cutting tools sharpened and clean. (When we are using our secateurs all day they get sharpened every morning before starting :-)
- Hand Pruners (Secateurs): For small branches and twigs.
- Loppers: For thicker branches.
- Pruning saw: For very thick branches or stems.
- Gloves: To protect your hands.
Locate all broken, split, or dead branches. Cut them back to the nearest healthy joint or stem... in some cases close to the ground (see example 2).


Encouraging New Growth
- Thin out dense areas: This allows light and air to reach the interior of the plant, promoting healthy growth.
- Shape the shrub: Light trimming can help maintain the natural shape of the shrub while removing any parts that might have been distorted by snow or ice.
- Prune at the right time: Spring-blooming shrubs such as Lilac, Magnolia and Forysthia are usually pruned after they bloom, however, if damage is extensive, immediate pruning may be necessary to removed broken branches. Summer and Fall blooming shrubs such as Hydrangea paniculata, Rose-of-Sharon, Spiraea as well as Roses are usually pruned in spring and will bloom later in the season on new growth.
To help with the further recovery of your trees and shrubs in the coming year, pay special attention to ensure they have adequate water and fertility to support new growth all season long.
Still have questions? Or not sure what to prune when? Stop by the garden centre to pick up a free pruning guide handout.
- Kristin Ego
Tips to make your garden more pollinator friendly
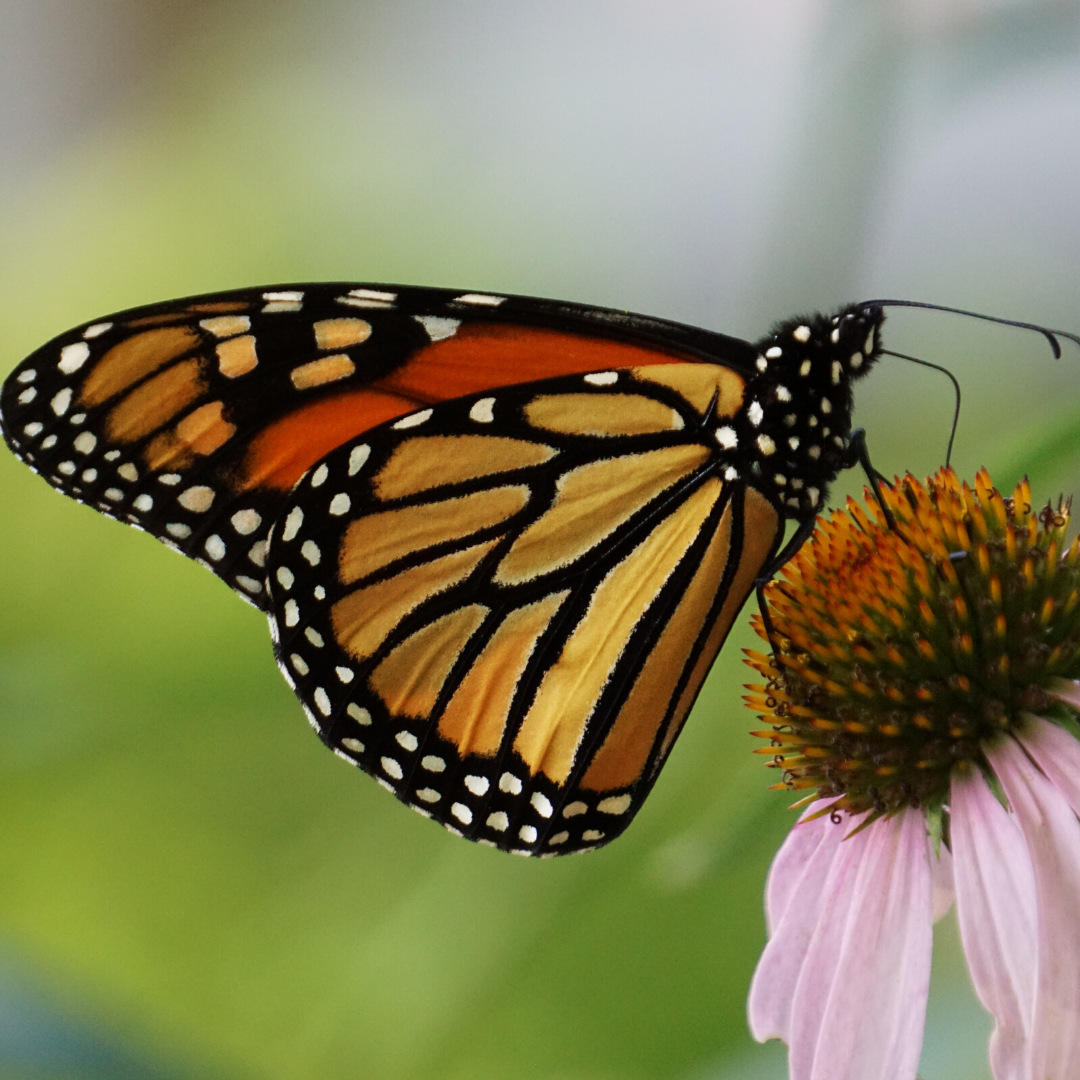
Pollinators, including bees, butterflies, beetles, birds and bats, play an essential role in maintaining healthy ecosystems. They provide the service of pollinating our crops and plants, which in turn increases crop yield and biodiversity in the natural environment!DID YOU KNOW?
Pollinators are responsible for pollinating over 30% of the foods we eat!
Plan ahead:
Pollinators, such as bees and butterflies, require a constant source of food from when they emerge in the Spring, right through to the Fall. Be sure to have a continuing sequence of flowers in bloom to provide pollen throughout the growing season.
Plant native:
Native plants have co-evolved with pollinator species, and are well adapted to the climate, soil, and growing season. It is okay to plant non-native plants as long as they are not invasive, and are planted according to the label.
Plant single bloom varieties:
Pollinators can navigate single bloom flowers much more easily because their nectaries are exposed, allowing easy collection of nectar and pollen. Petals of double bloom varieties often block the flower's' nectary, making it difficult to navigate.
Plant host plants:
Butterflies require specific host plants to lay their eggs, so that their offspring (caterpillars) can feed on them once they emerge. For example, monarch butterflies require milkweed to feed on in the early stages, so that's where adult monarch's lay their eggs. Once the caterpillars become butterflies, they feed on lots of nectar and pollen sources.
Mass planting:
Try to group plant species together instead of single plants throughout your garden. For example, planting a large patch of Echinacea. Mass planting helps pollinators spot resources more easily, pollinate more efficiently, and spend less energy collecting pollen and nectar. Bees tend to collect pollen from one type of plant at a time.
Water and fertilize sufficiently:
Proper watering helps maintain healthy plants, which increases nectar and pollen sources for pollinators. Try to use natural fertilizers, such as compost, to help add nutrients to the soil. If necessary, use a slow-release fertilizer. Pollinators are very sensitive to chemicals, so try to remove weeds by hand.
Deadhead and prune:
Regular trimming and deadheading plants will encourage new growth for more blooms, and a longer flowering season. The more pollen and nectar available, the better!
Minimize manicuring:
Perfectly manicured lawns and gardens do not have as much of a benefit to pollinators. The bees will thank you for leaving those pesky dandelions on your lawn, as they provide essential nutrients in the early spring. Fallen trees can provide crucial habitat for the many species of cavity nesting bees when left in your garden. Excessive raking or tilling should be avoided to prevent destroying ground-nesting pollinator's nests.
Leave patches of bare soil:
There are many native bee species that build their nests in the ground, by tunneling into the soil. You can provide habitat for them by leaving areas of bare soil throughout your garden, hidden behind your plants.
Provide a nesting box:
Nesting boxes can be purchased at many garden centres. There are also many different ways you can build nest boxes for native, cavity-nesting bees. They love to build nests in hollow reeds or existing tunnels in untreated wood.
Provide a water source:
Pollinators also require a source of fresh water. You can provide a safe water source in your garden by filling a shallow dish with water and marbles. Bees and other pollinators can land on the marbles and collect water without the risk of drowning. It is important to change the water often and keep it full, as bees and other insects will return to the source. By incorporating these ideas into your garden, you can provide crucial habitat and nutrition for many pollinator species that are currently at risk.
YOU can make a difference!
Many pollinator species populations are at risk due to a combination of many different factors, including: climate change, habitat loss, and pesticide exposure. The decline of pollinator species could ultimately lead to a parallel decline of plant species, threatening biodiversity and food security. Habitat destruction and fragmentation is having a significant effect on pollinating species.
Providing foraging and nesting opportunities in your own garden can reduce this stress significantly.
BONUS TIP!
Pollinators locate food sources by sight and scent.
It is important to keep in mind that not all pollinators see colour the same as we do, like honey bees for example. We base our vision off of three colours of light: blue, green and red. Whereas honey bees base their vision off of blue, green and ultraviolet light. This combination makes it very difficult for a honey bee to decipher a red flower from a green background. You can help out the honey bees by choosing flowers that have white, yellow, blue or purple flowers. This will help them spot resources in your garden more easily! Pollinators will also go crazy for aromatic flowers, such as lavender!
For more information:
To download a poster filled with tips and a list of garden plants that will promote and attract bees and other pollinators to your garden, please visit the Flowers Canada website at: www.flowerscanadagrowers.com/pollinator-poster
- Kristin Ego
Summer’scaping
Working on your “Summer’scape”

If you survey most homeowners they will share that the best time to plant any plant is ‘spring’. And if you dig further in survey form you will get a lot of reasons why not to plant anything in summer.
Well – there are a few items that are better in ‘spring’ – such as a few bare-root shrubs or bulbs. But we would like to share that most plants work just fine with ‘summer’ planting. One really good indicator of the wisdom of summertime garden projects is to look at the professional landscapers – who spend all summer installing both residential and commercial landscape projects.
If the pro’s do it – we can too!
So – the idea of Summer’scape – doing some garden and landscape projects all summer….
A few things that are different about summer plantings. The most important is that we are working with living plant material that is actively growing – so we do need to be aware of the soil / root zone and take a few extra steps.
First up is plant size – or maybe worded differently pot/root ball size. Most of our summer plantings we tend to favour plant material that is in larger pots or containers. A good example of this might be a bedding plant annual – in spring we typically plant annuals in cell packs or small pots – while in summer we like to use plants grown in larger pots – say a 6” (15cm) pot versus a smaller cell pack. We like the larger root ball for a bunch of reasons. The practical reason is that in the heat of summer – a larger root mass will dry out less quickly – it is planted deeper in the soil and due to it’s bigger size and the added protection of a deeper hole there is generally better root penetration down and the plant can take off and grow more easily. Another reason is more ornamental in nature – but summer planted plants are typically bigger as we have less of the season to enjoy them – and the plants have less time to grow. In summer bigger is always better!
Second big difference is in water management. A spring planted flower or woody plant has the benefit of cooler temperatures as well as benefiting form our typically rainy spring weather. Planting in the heat of summer means that we do have to water more carefully to help our new summer planted landscape get established. We need to make sure we are adding the right soil amendments to hold some moisture (peat and compost) as well daily or as needed watering. We often talk about watering deeply – and in the case of summer plantings that means making sure that bigger soil ball we planted gets water all the way to the bottom of our root zone. Worded differently – give your newly planted summer plants a good solid soaking with that hose.
A few tricks to get the roots zone of a Summer’scape going. Traditionally we like to use a high phosphorous ‘transplant’ fertilizer – high middle number. Since our plant is already bigger than a spring planted flower or shrub we can back off the first number (N) and focus on roots. Anything that can boost roots in a summer planting is a good idea. Finally we always like adding a layer of mulch – 7-8cm of mulch around summer planted plants will help keep the soil cool and help keep the water in the root zone – hugely important if the weather turns nasty hot right after planting.
So take a tip from the pro’s and look at Summer’scape projects all summer long.
- Kristin Ego

